Derek Eder
Civic Tech Builder

I use data, build tools, and organize people in Chicago to democratize power. Read more »
 DataMade
Founder and Partner
 Village of Oak Park
Trustee
 Chi Hack Night
Co-Founder and President Emeritus
Wanna talk? Email me
Want to get my next post in your inbox? Sign up for email updates »
Electrifying Our Old Oak Park Home #3: Appliances
Published on Aug 22, 2023
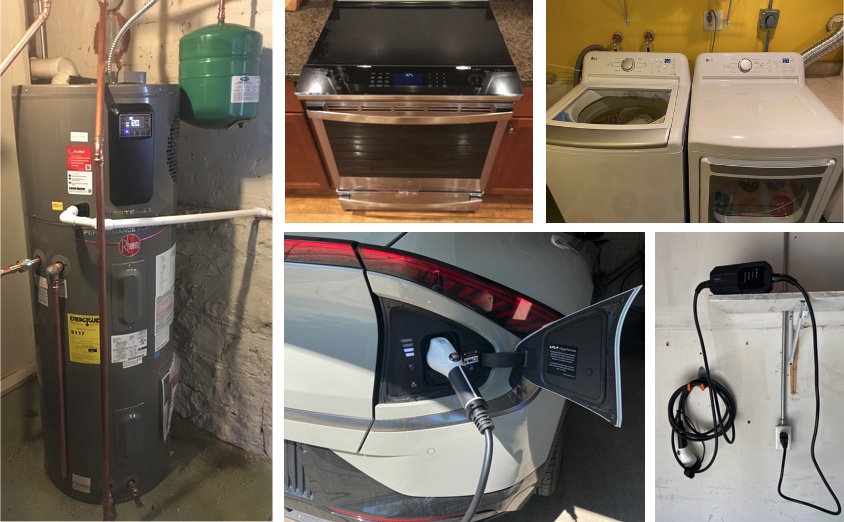
This is Part 3 of my series Electrifying Our Old Oak Park Home. Read the rest here.
As of this writing, we have installed solar panels on our roof (giving us a source of free renewable electricity), switched out our gas furnace with electric heat pumps, and replaced all gas appliances with electric equivalents in our 100-year-old Oak Park home. We have shut off our gas service and upgraded our car to an electric vehicle (EV), charging it basically for free at home, eliminating our reliance on polluting gasoline with its rising costs.
In other words, we have fully electrified our home, significantly cutting the harmful emissions our house and car cause, while reducing our utility bills in the long run. This is a process known as electrification, and it’s one of the most impactful actions a household can do to fight climate change.
Why? In Illinois, 15% of our state’s emissions come from the appliances in our homes and businesses, 26% come from cars and other forms of transportation like trucks and planes, and 24% come from the coal, gas and oil power plants used to produce our power. Our home is no longer directly contributing to any of those.
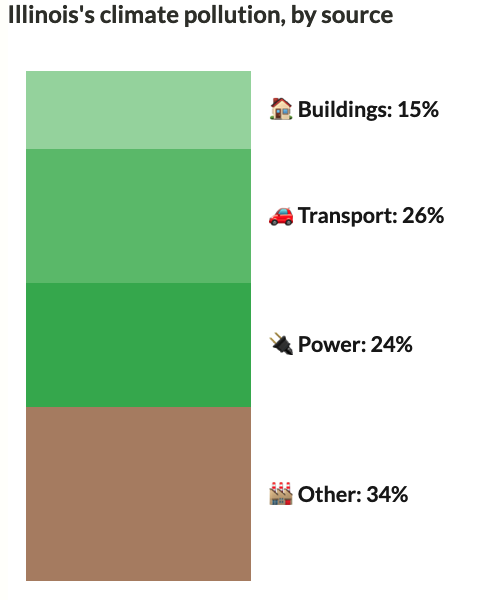
Illinois climate pollution by source, from DecarbMyState.com
We are part of the clean energy transition that is well underway in the United States, thanks to legislation like the Inflation Reduction Act (IRA) and the lowering costs of solar panels, electric vehicles, and electric appliances. While this transition is inevitable, it is crucial that each of us do what we can to make it happen faster to get to net zero emissions by 2050 to avoid the worst effects of climate change.
While most newly constructed homes are efficient, existing homes are a different story. They are often poorly insulated, reliant on gas for heating and cooking, and not wired for increased electricity usage, requiring a range of upgrades that can be costly and difficult to find the right contractors for.
That’s why I’m writing this post. We’ve made the switch to being fully electric in our 100-year-old home, and if we can do it, so can you. In this post, I’ll explain the final steps we took to electrify our home by replacing our stove, hot water heater, clothes dryer and car with electric equivalents. These upgrades allowed us to fully cut our gas usage and eliminate the last ~20% of emissions from our home.
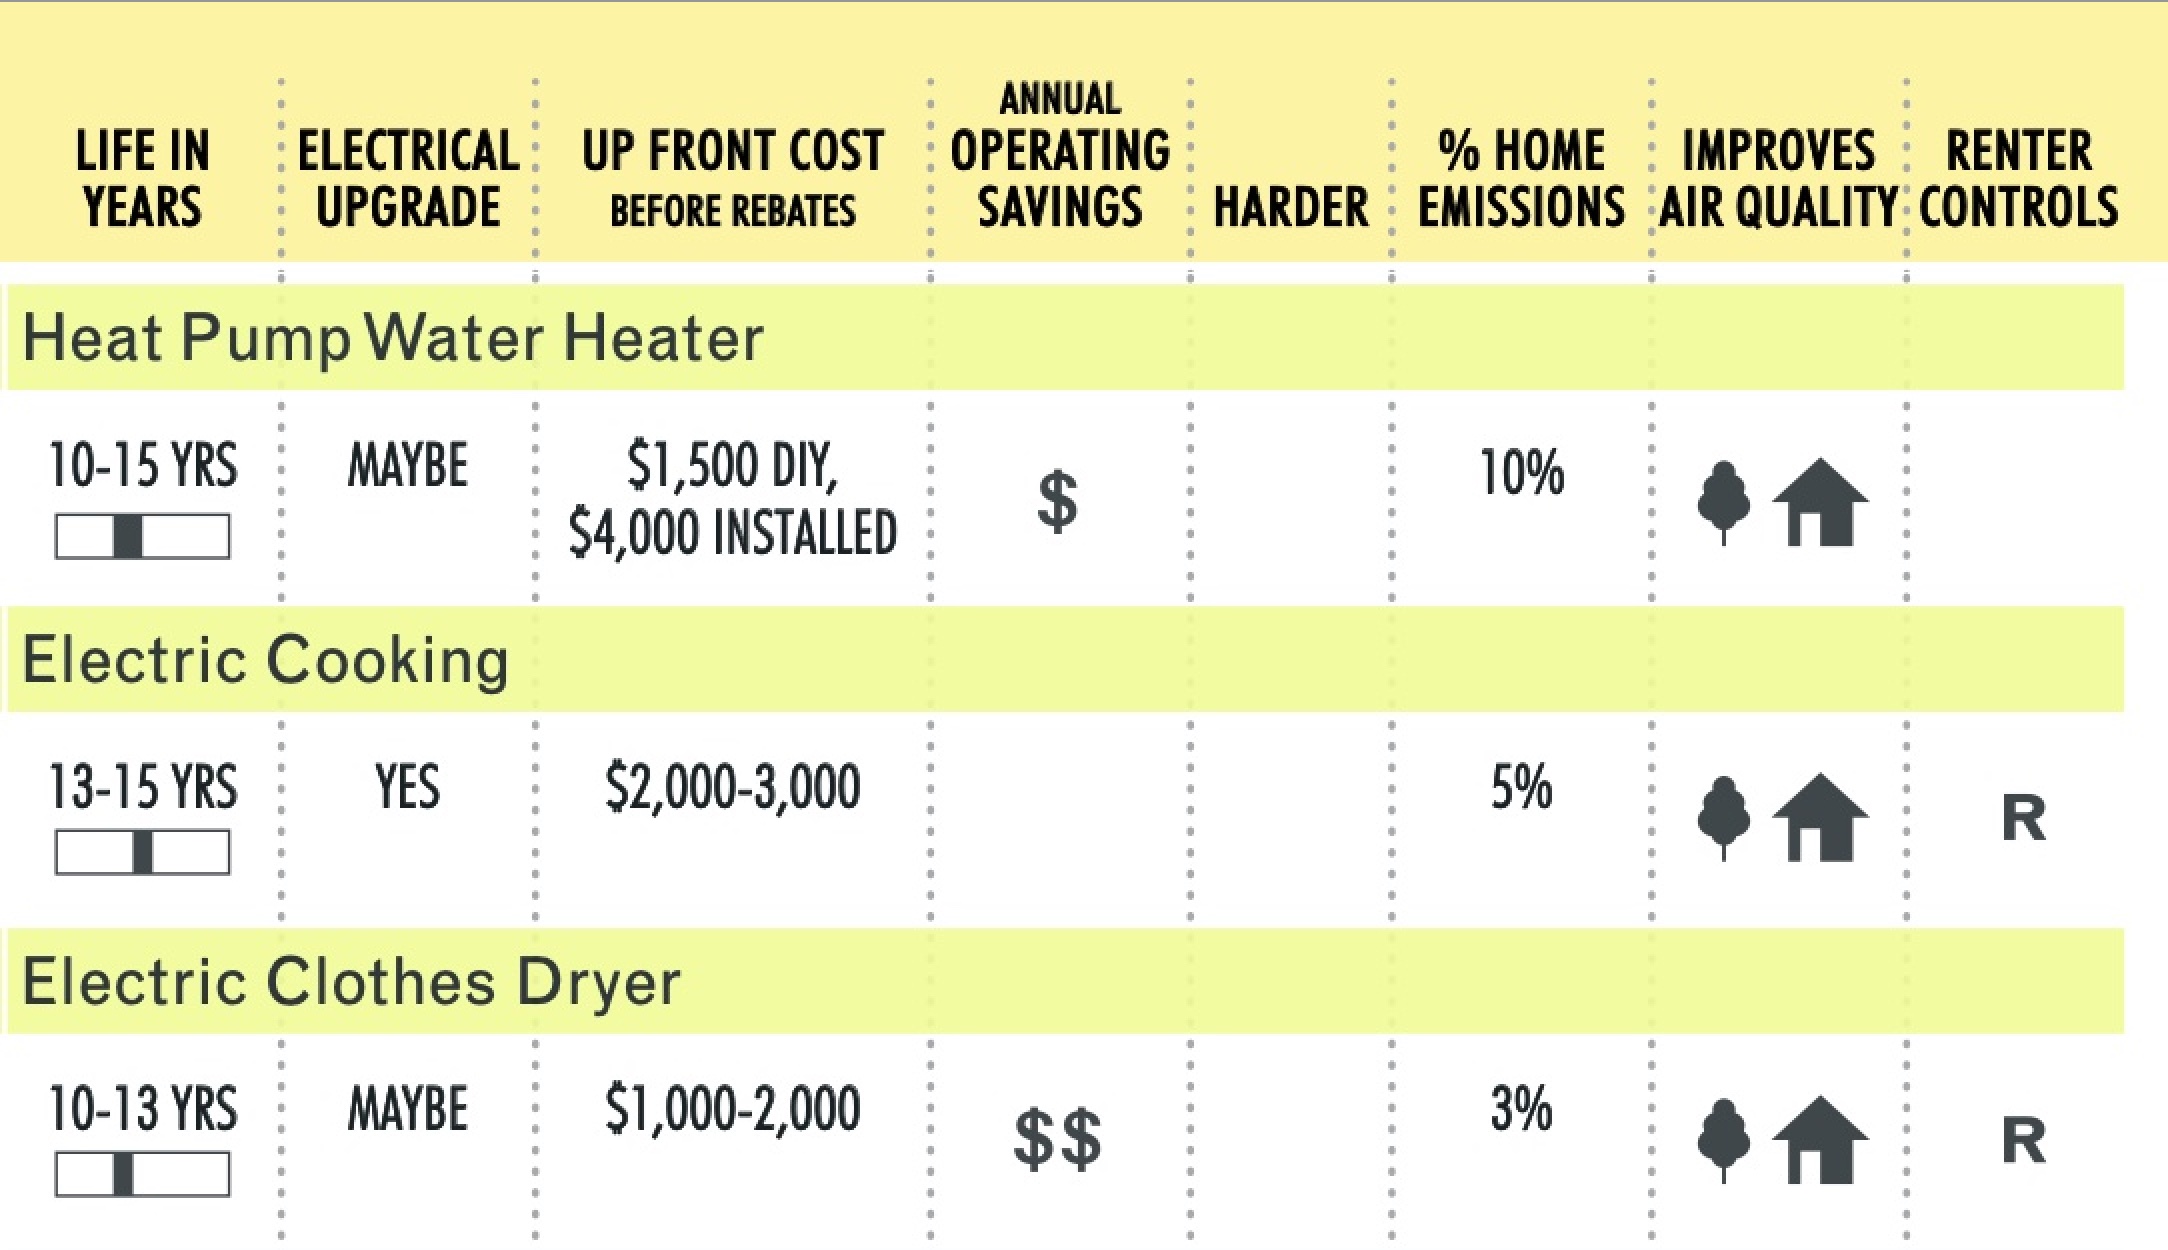
Table of appliance electrification impacts from Rewiring America’s Electrify Everything home guide
Ready? Let’s dive into Part 3 of Electrifying Our Old Oak Park Home: Appliances.
Table of contents
- Cooking with magnets: upgrading to an induction stove
- Switching to a heat pump hot water heater
- Installing an electric clothes dryer
- Charging our electric vehicle (EV)
- Shutting off the gas
- Bottom line costs and incentives
- The overall cost for electrification
- Why did we do this?
- Lessons learned
- Resources
Cooking with magnets: upgrading to an induction stove
The first appliance we replaced was our gas stove with an induction stove. Induction stoves are 100% electric and work by heating pans directly with a magnetic field. The result is a very efficient and fast way to cook that doesn’t cause any unhealthy levels of air pollution like a gas stove does.
One thing to keep in mind is that not all your pans will work with an induction stove. A simple way to check is if a magnet sticks to your pan, it will work with induction. Otherwise, it will not.
Installing the range for us was pretty simple, though we did have to run a 240-volt outlet to our kitchen. Induction stoves require a higher voltage, so the typical 120-volt plug won’t work. Thankfully, we had upgraded our electrical panel to 200 amps in preparation of electrification, so we had plenty of space to add the high voltage outlet (it took two slots). We hired Kinetic Energy to run the conduit for the new outlet. After that, it was a matter of sliding out the old range and sliding in the new one. To prevent gas leakage, we put a copper cap over the gas line behind the stove.
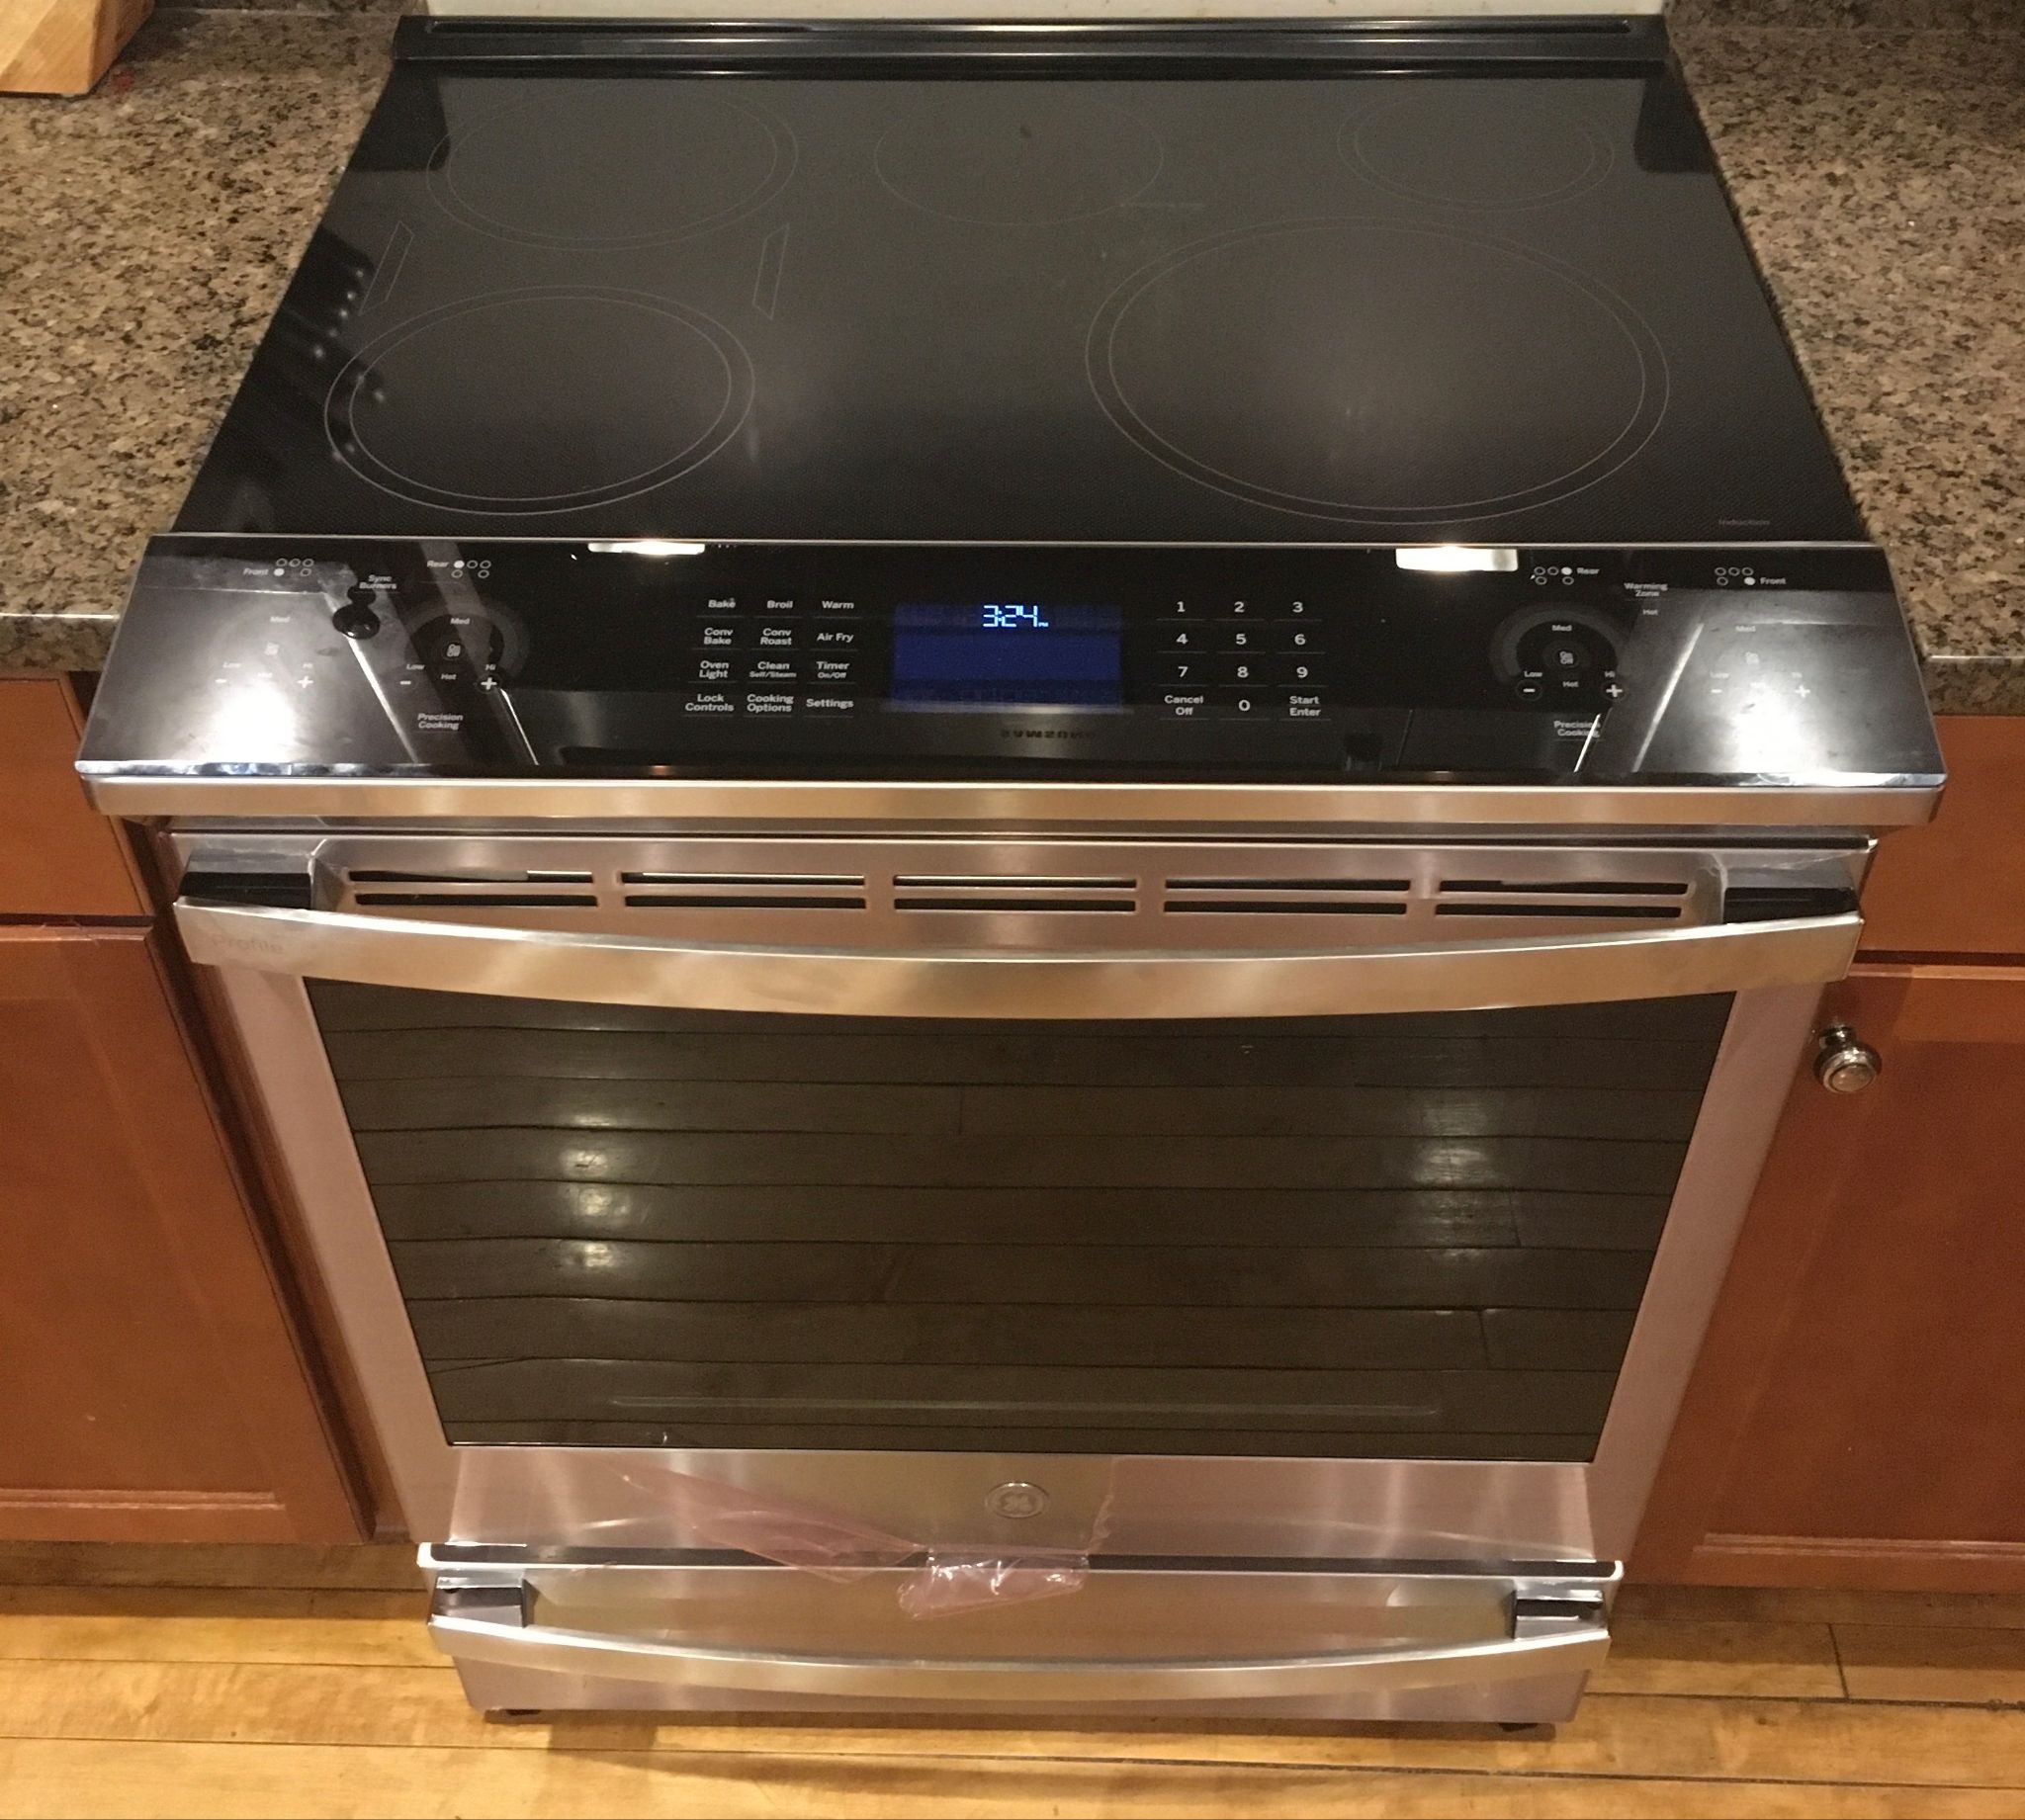
Our GE Profile 30" Induction Range
In addition to the peace of mind we gained from knowing that we weren’t polluting the air in our house with gas fumes, we’ve really enjoyed the switch to induction. Things really do cook a lot faster (it can boil water a full minute faster than gas) and you have much tighter control over the heating level.
Switching to a heat pump hot water heater
The next appliance we replaced was our hot water heater. Our 40-gallon tank was installed in 2007 and, like our gas furnace, was at the end of its life. For convenience, we decided to have it replaced at the same time as our heat pumps by Energy Matters.
As you might guess, a heat pump water heater uses heat pump technology. It draws in heat from the surrounding area and transfers it to heat the water. Because of this, it is very efficient, though not quite as fast as a gas water heater in warming large amounts of water from cold to hot.
Like heat pumps, these water heaters are constantly on at a lower level, are generally sized a bit larger, and have standing temperatures set higher than their gas counterparts. To replace our 40-gallon tank, we installed a Rheem 50-Gallon Platinum Hybrid electric heater.
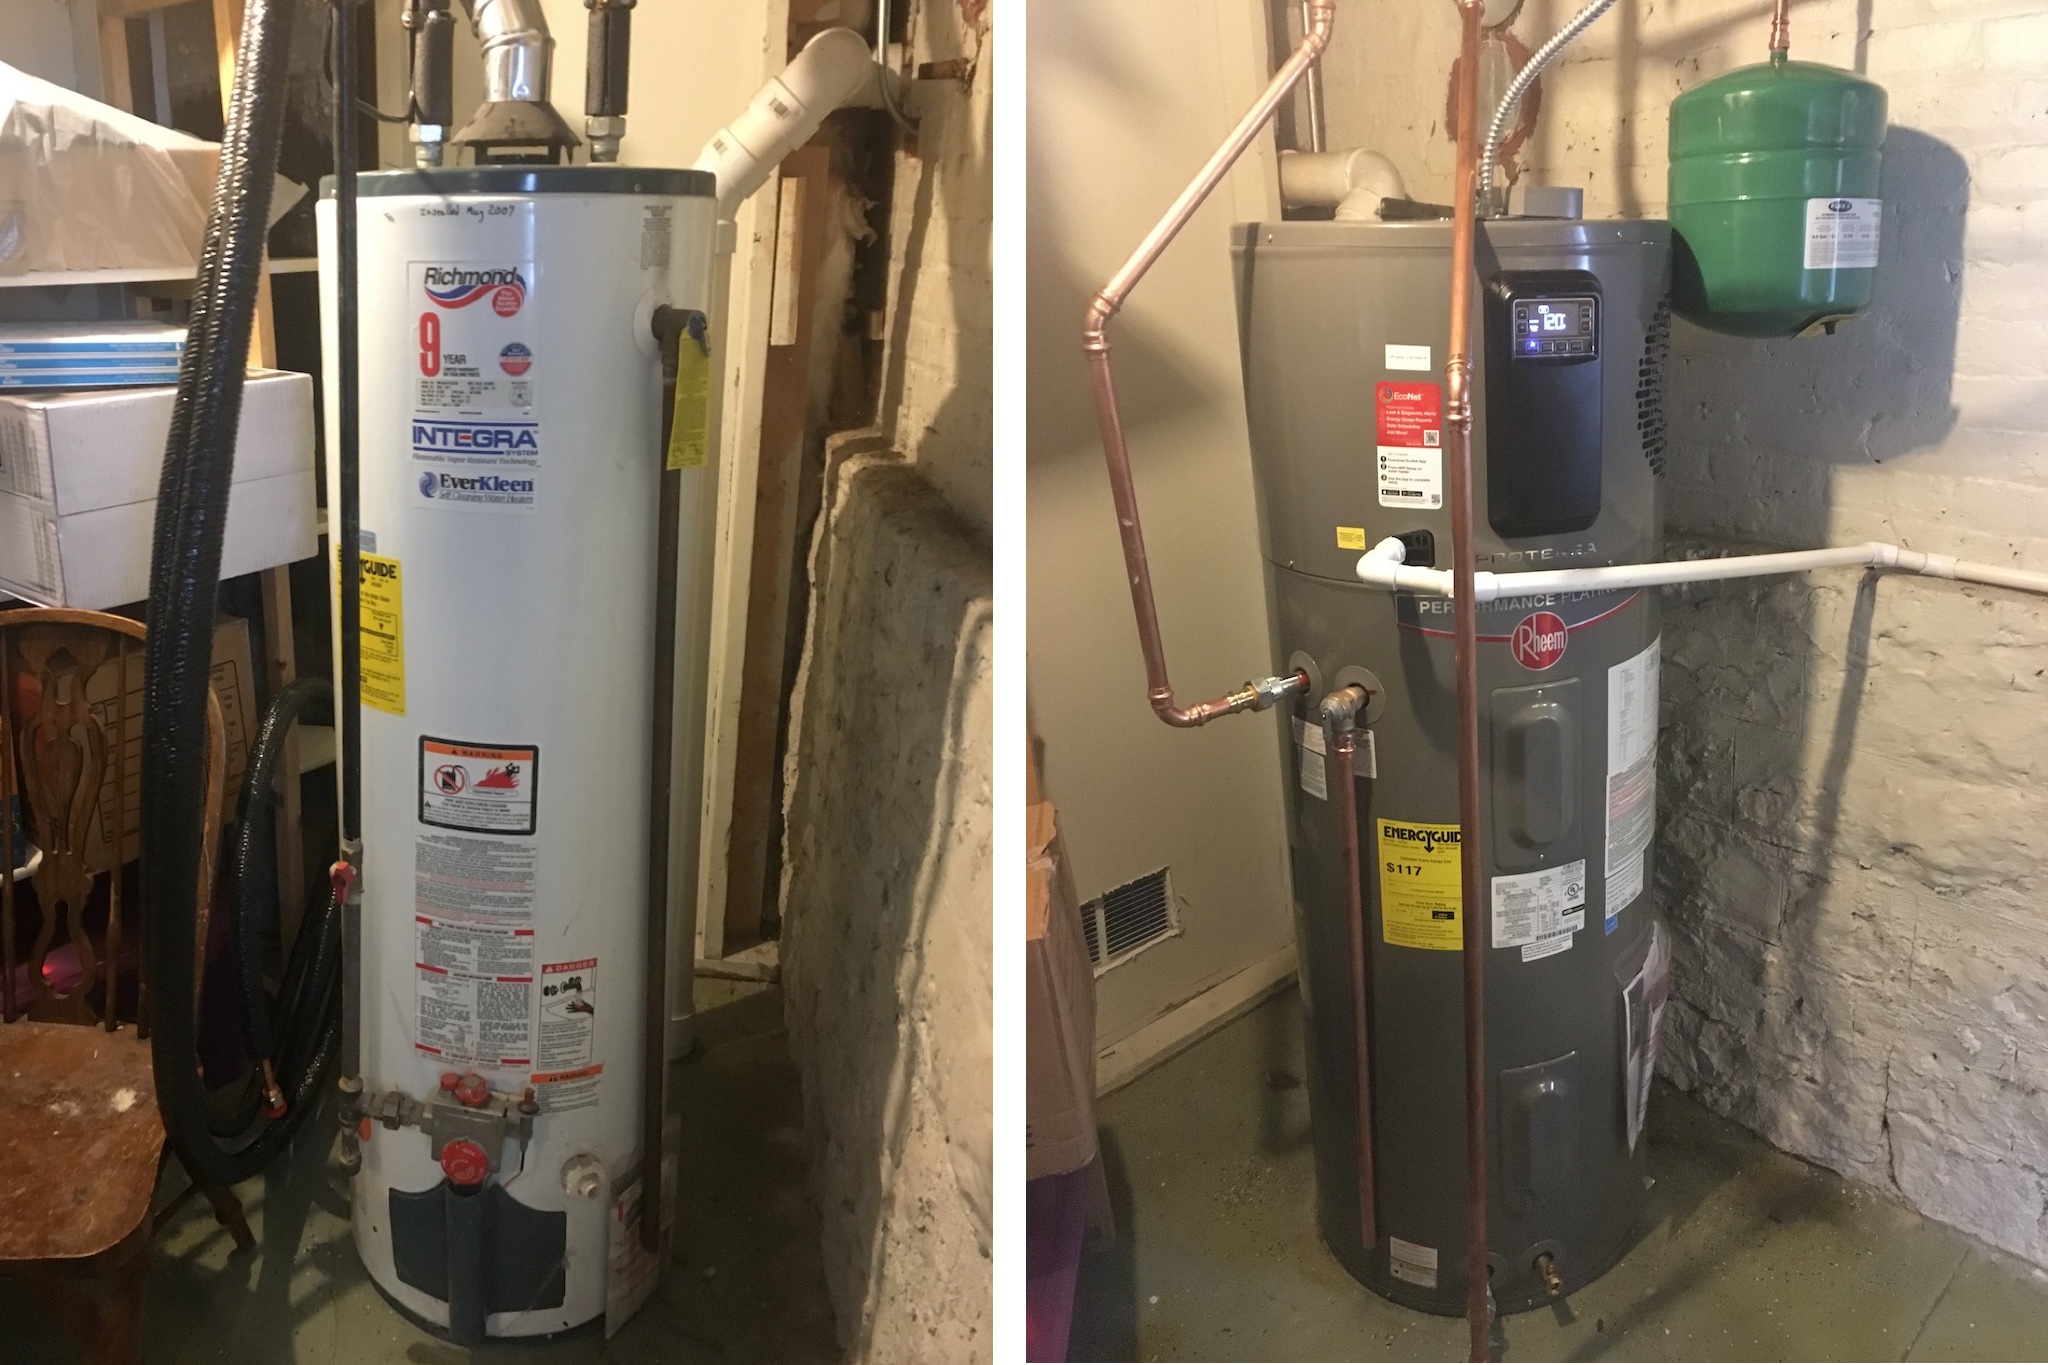
Left: our old gas water heater. Right: our new heat pump water heater
The unit is a bit larger due to the heat pump element on top. This element has a fan that is constantly on and drawing heat from the room it is in. Because of this, it makes a constant low level hum and cools the room it’s in by a few degrees. This is fine for us because we have a utility room in our basement, but may be inconvenient depending on where your tank is located.
Since switching to the heat pump water heater, we haven’t noticed much of a difference in our day-to-day life. We have plenty of hot water, and it takes a lot less energy to run! We were also able to seal off the ventilation hole that wasn’t needed any more, giving us a small insulation bonus.
Installing an electric clothes dryer
Our final appliance was our clothes dryer. We only run it a few times a week, so when it came to emissions and energy use, it ranked pretty low. However, it was the last thing on our list to electrify, and doing so allowed us to shut off our gas completely.
You have some options for what kind of electric dryer to get: ventless heat pump dryer, condensing dryer, or a regular resistance heat dryer. Both the heat pump and condensing dryers are more efficient and can be placed anywhere because they don’t need an external vent, but have a higher up-front cost ($1,000–$2,000). Because we don’t use our dryer often and electricity is nearly free for us due to our solar panels, we opted for getting a regular resistance heat dryer by LG.
For any kind of electric dryer, though, you’ll probably need to upgrade your outlet (though there are some 120-volt plug dryers out there). For us, similar to the induction stove, we needed to install a 240-volt dryer outlet. Again, we had planned for this and were able to utilize the same conduit as our stove, as our laundry room is right below our kitchen.
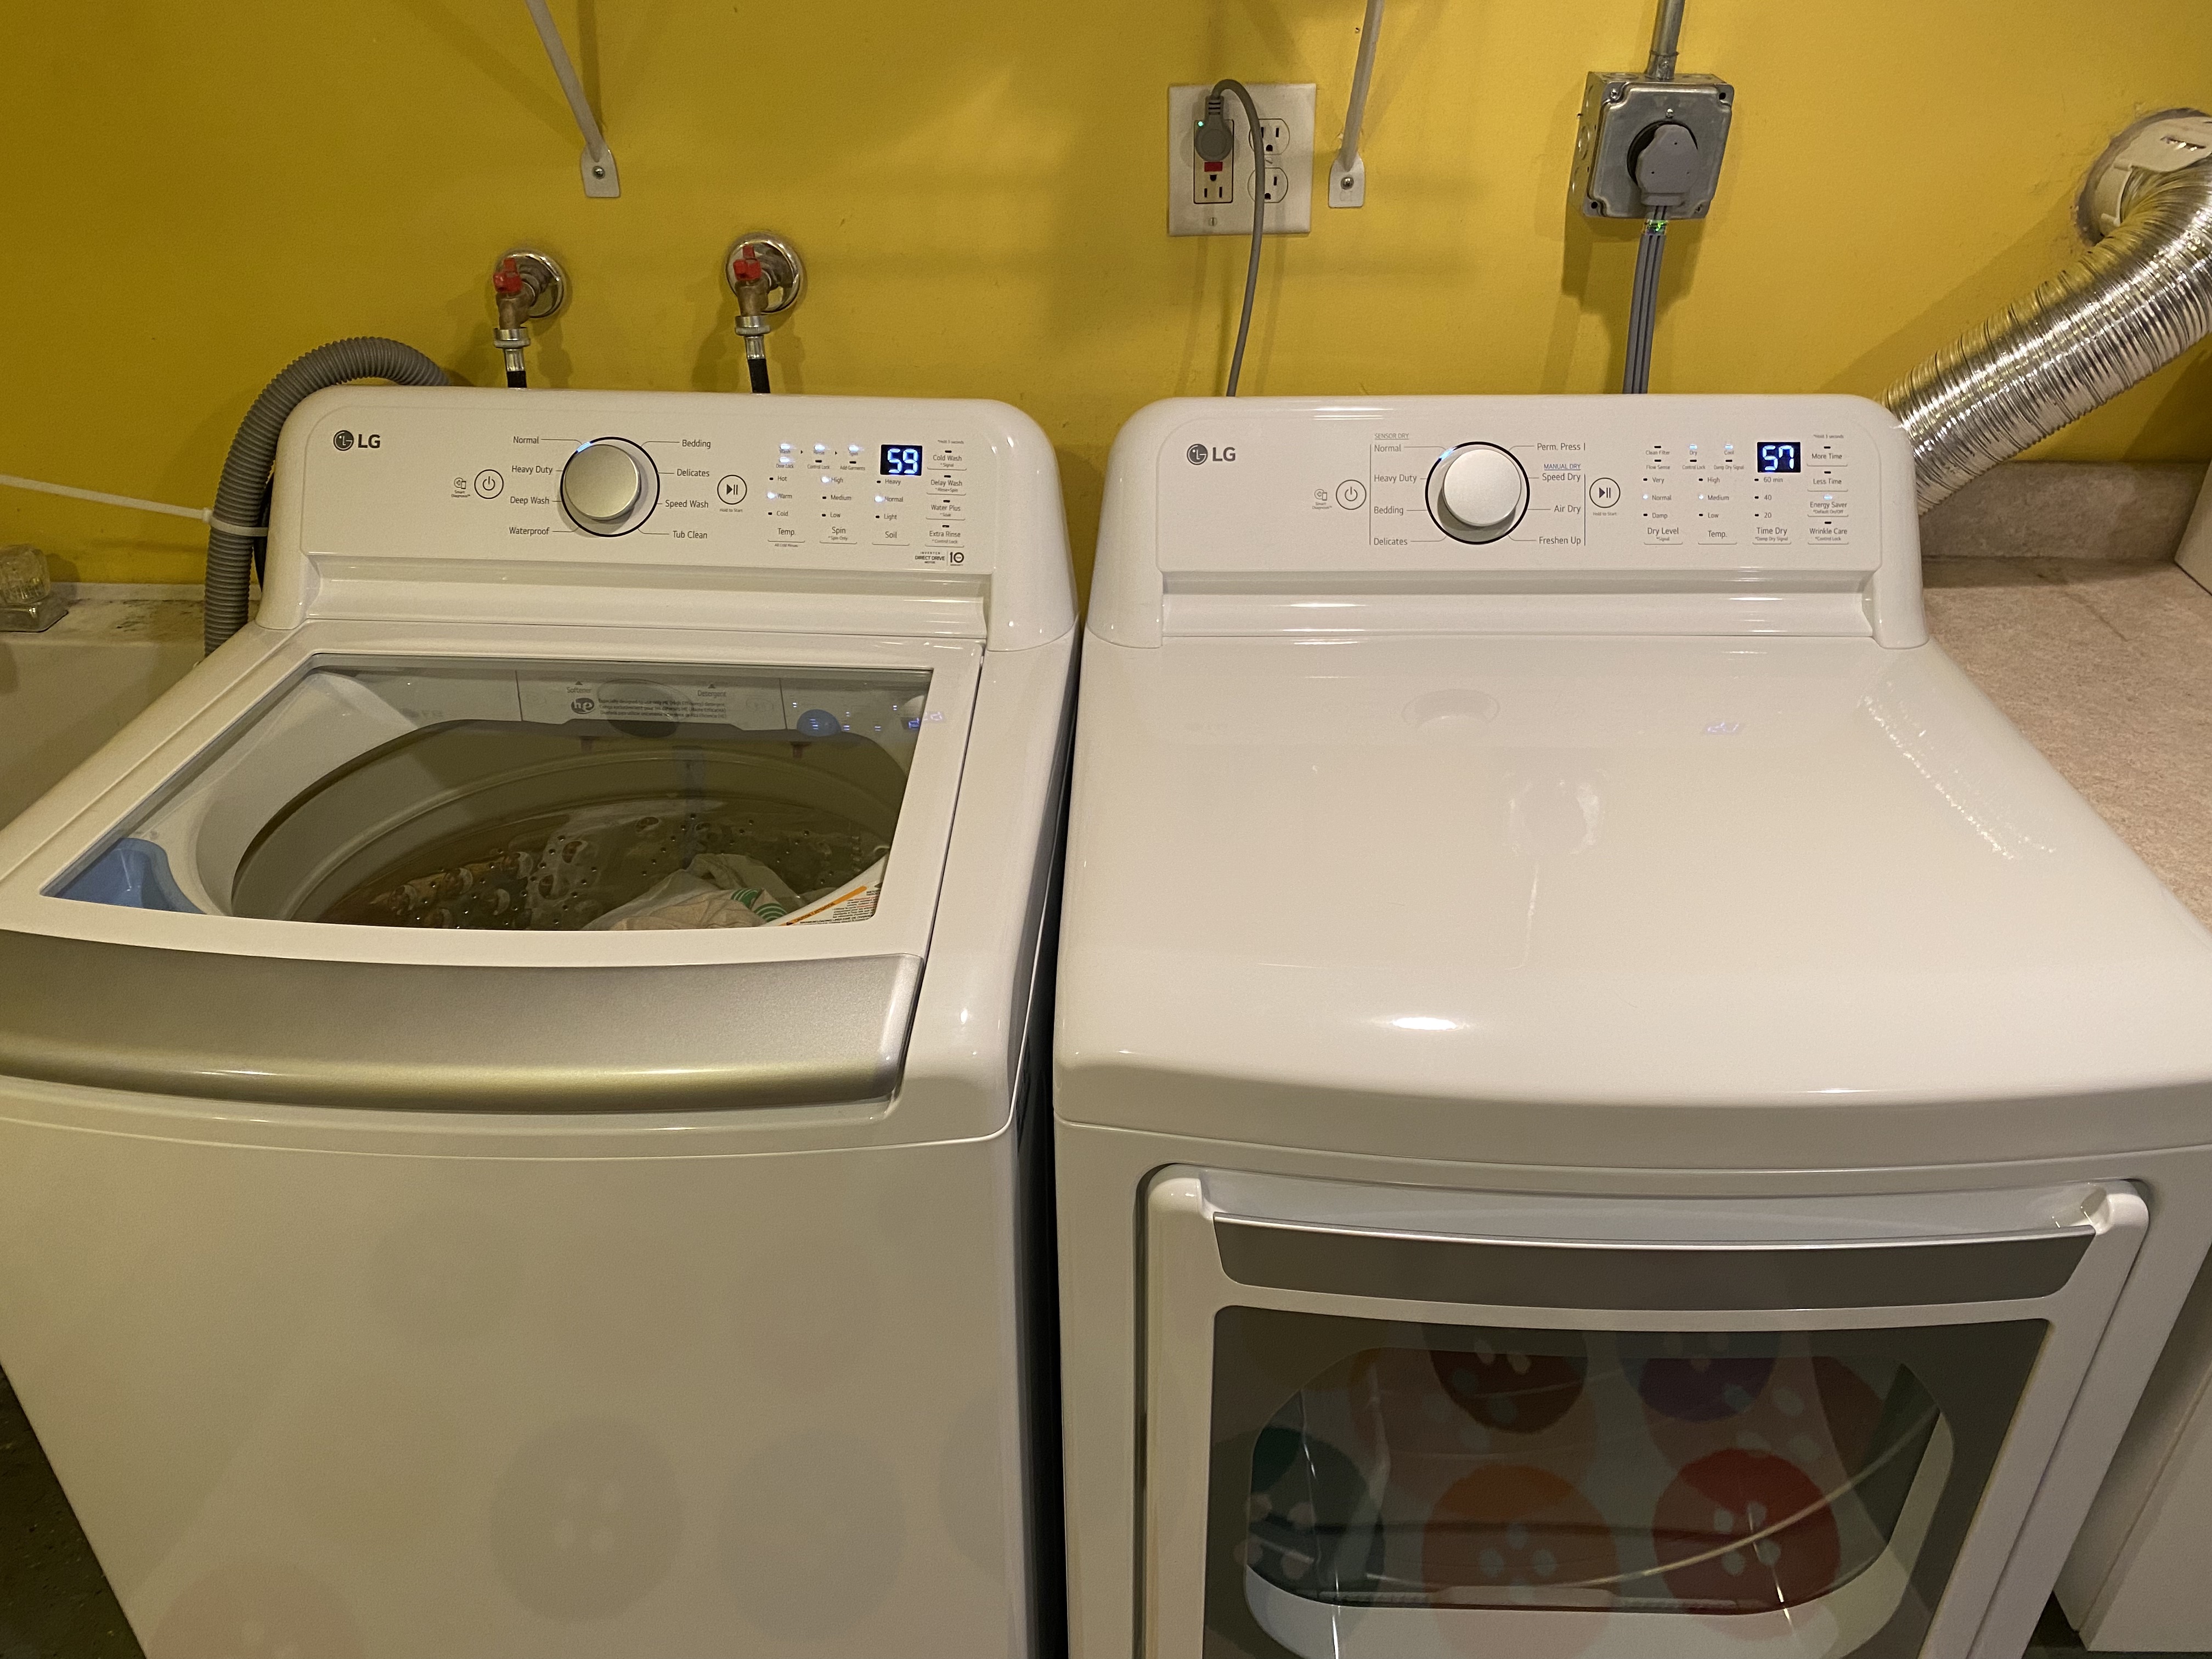
Right: LG - 7.4 Cu. Ft. Stackable Electric Dryer
Note: If you are installing a new 240-volt outlet, keep in mind the type of plug, as they are not all the same! We originally had a 4-prong (NEMA 14-30) plug installed, but our dryer came with a 3-prong plug (NEMA 10-30), which is apparently typical for dryers. It was easy enough for our electricians at Kinetic Energy to swap out, but it did delay our installation by a few days while we waited for the work to be scheduled.

Not all 240-volt plugs are the same! Make sure you know which one your appliance needs. Source: Rewiring America
Charging our electric vehicle (EV)
As part of our home electrification process, we traded in our gas-powered 2011 Honda CR-V for a pre-owned 2023 Kia EV6 Wind.

Our pre-owned 2023 Kia EV6 Wind
Purchasing a car is different for everyone and can vary wildly in cost, depending on your budget and what is important to you. If you are looking to switch to an electric vehicle, a great place to start researching is Edmund’s EV buying guide. There are already over 50 models available, with many more expected in the coming years.
We decided to purchase a used 2023 Kia EV6 Wind. It has 284 miles of range, excellent safety and reliability ratings, fast charging, and enough space for our family’s needs.
As our first ever electric car, charging was a new concept for us. Instead of going to the gas station every few weeks, we can charge it right in our garage. Depending on the outlet you have, different speeds of charging are possible. Plugging in to a standard 120-volt wall outlet is called Level 1 charging, which will give you about 4-5 miles of charge per hour. Plugging in to a 240-volt wall outlet allows for Level 2 charging, which will give you 25-30 miles of charge per hour.
The folks at Ask This Old House have a great overview:
Depending on how much you drive, you may need a Level 2 charger. For us, we don’t drive more than 10-15 miles in a given day, so Level 1 provides plenty of charging for us. In fact, we could probably drive up to 50 miles in a day and still get enough charge overnight.
We have a detached garage which already had outlets installed, so we bought a simple charging cable capable of Level 1 or Level 2 charging (annoyingly our car did not come with one). To help preserve our battery life, we keep our battery between 20% to 80% and only charge it every few weeks. Our car has the ability to set the max charge level, so before we go on longer road trips, we set the max charge to 100%.
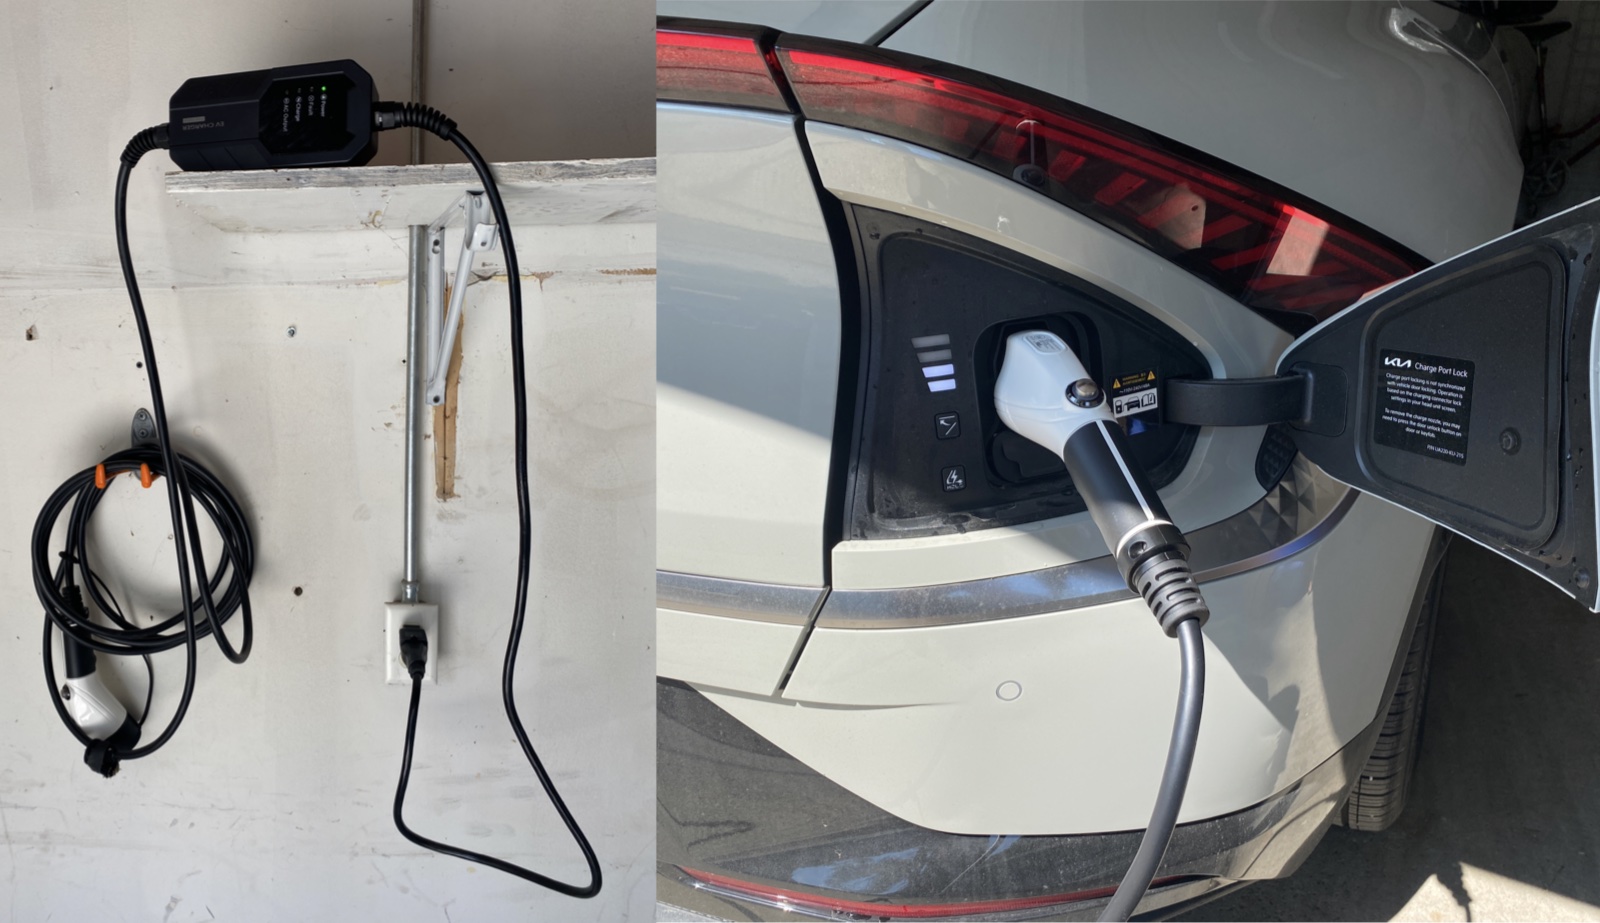
Charging our car in our garage with a Level 1 charger
We did look into Level 2 charging and decided it wasn’t worth it for us. Because of our detached garage, running the 240-volt plug would require either digging a trench with new conduit from our house, or running new electrical service directly to our garage. In either scenario, it would have cost us thousands of dollars to do. If you have an attached garage, or really need the Level 2 charging, it may be worth it for you.
Shutting off the gas
With our appliances electrified, we were ready to finally shut off our gas service. We decided to do this for two reasons. First, gas pipes are known to leak, leading to both air quality and safety issues. Second, having an active gas account requires a monthly connection fee, which is an unneeded expense.
So, after we were 100% sure we were no longer using gas, we went outside and shut off our gas valve ourselves.
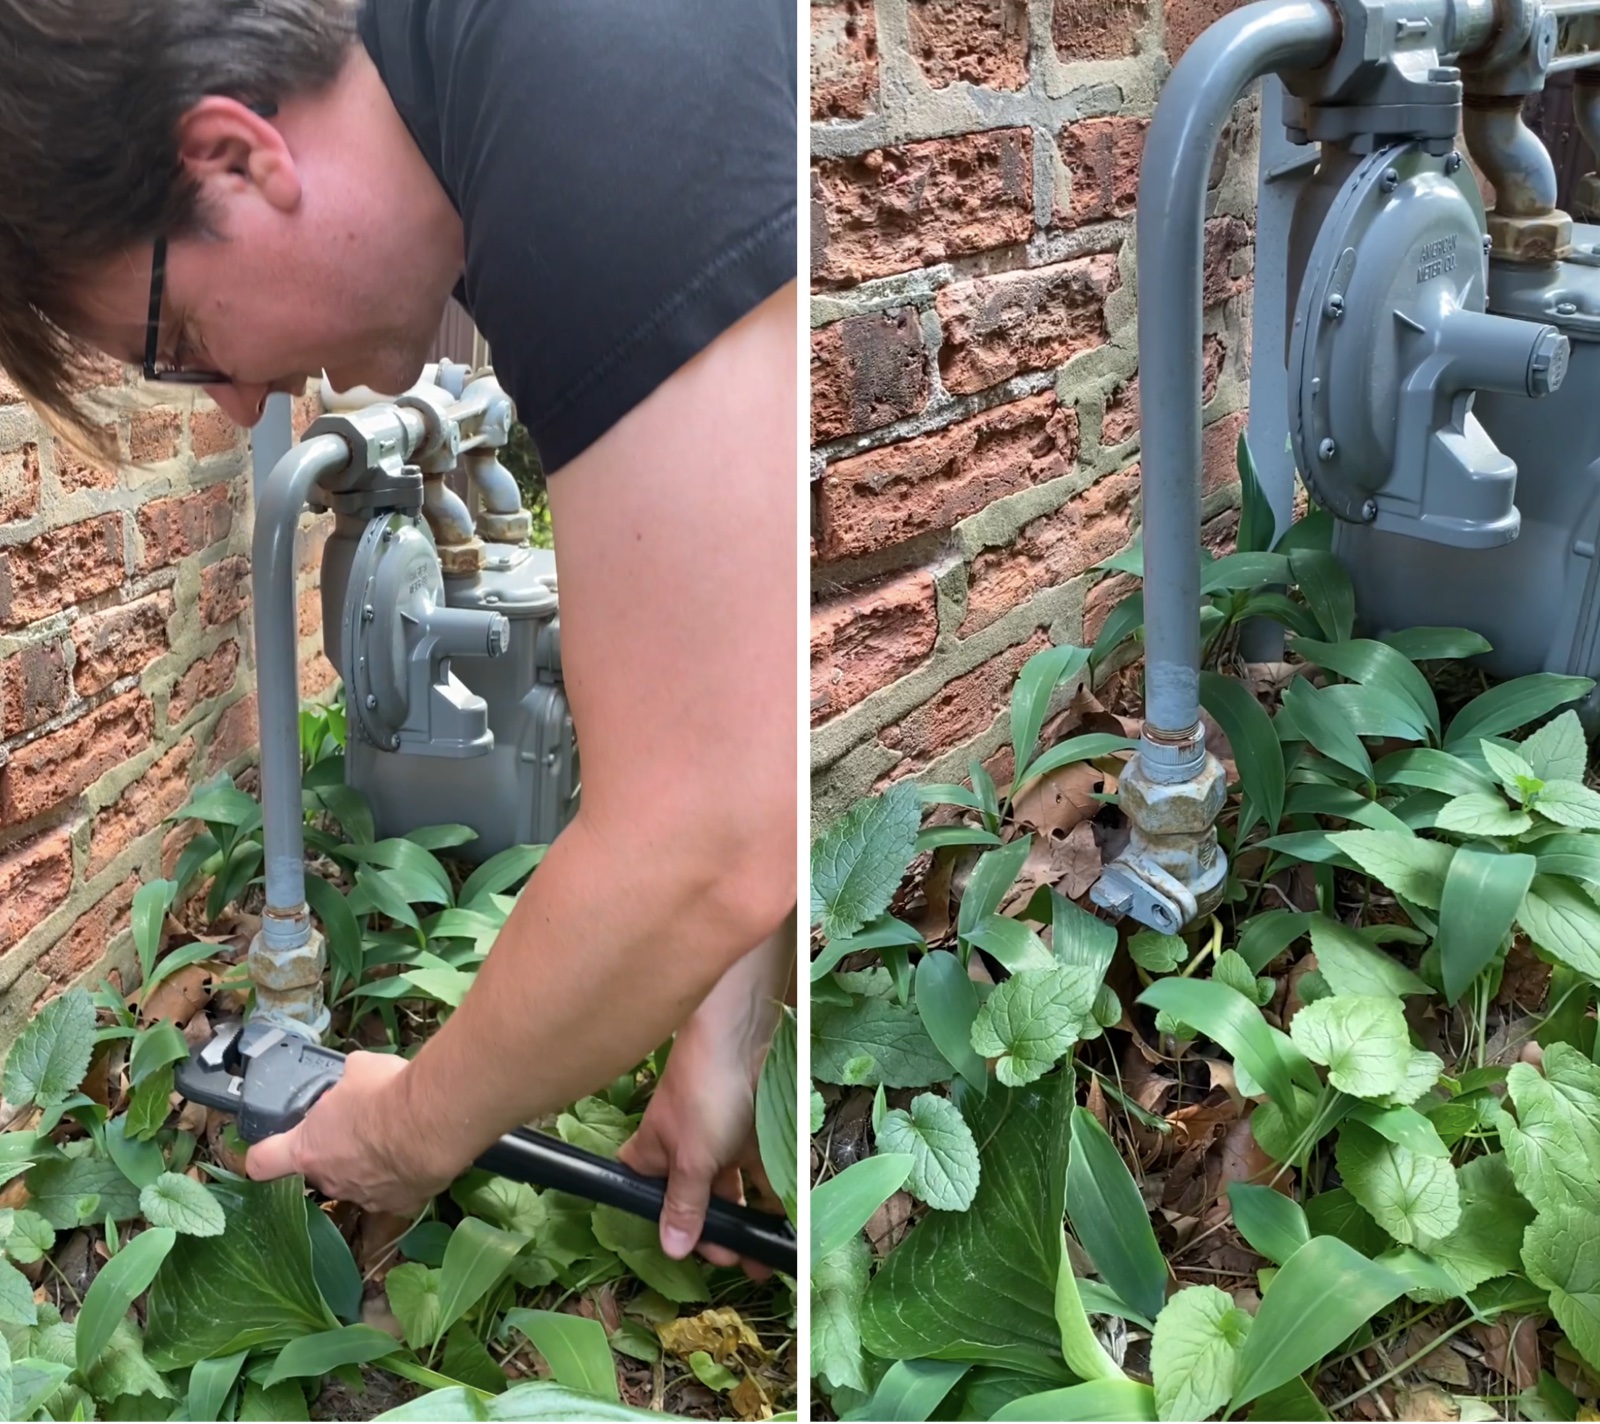
Shutting off our gas service
Finally, we emailed our gas provider, Nicor Gas, and canceled our service. They do this every day, so it was a pretty automatic process.
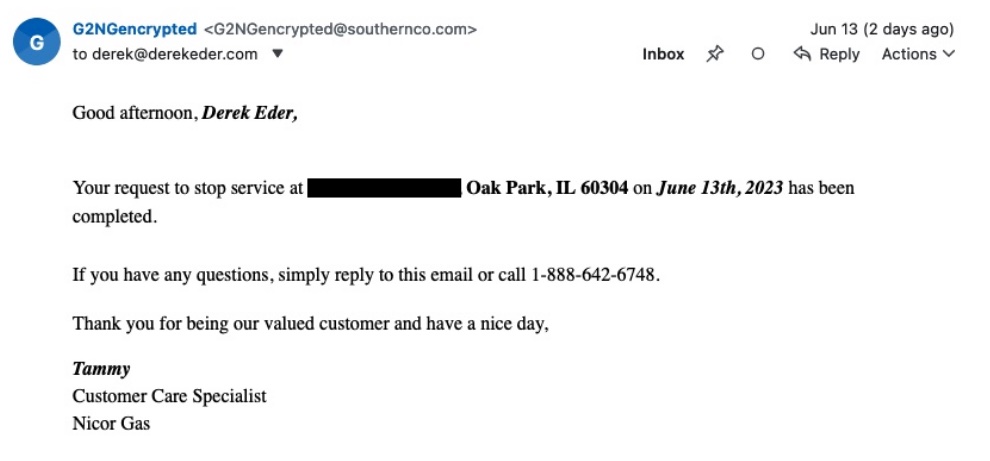
Email confirmation shutting off our gas service
And with that, our house was no longer using gas!
Bottom line costs and incentives
All told, electrifying our appliances and doing the electrical work to support it cost us $8,489. You can see the full breakdown here:
Appliances
| Item | From |
Cost |
| Rheem 50 Gallon Platinum Hybrid electric heater (electrical included) | Energy Matters | $4,000 |
| GE Profile 30" Induction Range | Costco | $2,400 |
| 240V kitchen outlet | Kinetic Energy | $976 |
| 250V dryer outlet | Kinetic Energy | $240 |
| LG - 7.4 Cu. Ft. Stackable Electric Dryer | LG | $690 |
| MEGEAR Skysword Ⅱ Level 1-2 EV Charger | Amazon | $183 |
| Appliance Total | $8,489 |
We know we paid a bit more than we needed to for our hot water heater, but it was worth it for us to have it done at the same time as our heat pumps. Ranges also vary a bit in price, so you can likely find a cheaper one than us.
As I mentioned in my Heat Pumps post, we could have saved money on our hot water heater if we had waited to do it the following year, as we already maxed out our tax rebate for upgrading to heat pumps.
The overall cost for electrification
As I mentioned at the top of this post, our home is now fully electrified. For those of you who are interested in seeing the whole picture, here is the full cost breakdown for our entire home electrification process, excluding our car purchase.
After rebates, and not including our car, we spent $46,202. The original cost, however, was reduced by 40% thanks to a combination of federal tax incentives, solar renewable energy credits, grants, and utility rebates, most of which applied to our rooftop solar panels.
Rooftop Solar Panels
| Item | From |
Cost |
| Roof tear-off | BlueSky Roofing | $6,450 |
| 1" roof insulation | BlueSky Roofing | $1,975 |
| 8.76kW solar panel installation | Ailey Solar | $25,970 |
| 200A panel upgrade | Ailey Solar | $4,150 |
| 26% Federal Tax Incentive | Tax Credit (Federal) | -$7,831 |
| Solar Renewable Energy Credit (SREC) Income (taxable) | Credit (Illinois) | -$8,251 |
| Energy Efficiency Program | Matching Grant (Village of Oak Park) | -$10,000 |
| Rooftop Solar Subtotal | $12,463 |
Insulation and Heat Pumps
| Item | From |
Cost |
| Blower door test | Insight Property Services | $450 |
| Aeroseal ducts | Clean Air Pro | $3,250 |
| Attic air sealing and insulation | Intelligent Energy Solutions | $2,525 |
| Attic air sealing rebate | Nicor Gas Rebate | -$225 |
| Energy Efficient Home Improvement Credit - Insulation | Tax Credit (Federal) | -$690 |
| 3.0-ton Mitsubishi Single Zone Hyper-Heating heat pump system | Energy Matters | $16,250 |
| ComEd direct rebate for ASHP > 16SEER | ComEd Rebate | -$1,400 |
| 1.5-ton Mitsubishi Single Zone Hyper-Heating Heat Pump system | Energy Matters | $7,000 |
| ComEd direct rebate for ductless heat pump > 16.1SEER2 and 9.0 HSPF2 | ComEd Rebate | -$1,350 |
| Drywall repair and painting | Oak Park Handy Human | $1,440 |
| 30% (up to $2,000) federal tax credit 25C | Tax Credit (Federal) | -$2,000 |
| Heating and Insulation Subtotal | $25,250 |
Appliances
| Item | From |
Cost |
| Rheem 50 Gallon Platinum Hybrid electric heater (electrical included) | Energy Matters | $4,000 |
| GE Profile 30" Induction Range | Costco | $2,400 |
| 240V kitchen outlet | Kinetic Energy | $976 |
| 250V dryer outlet | Kinetic Energy | $240 |
| LG - 7.4 Cu. Ft. Stackable Electric Dryer | LG | $690 |
| MEGEAR Skysword Ⅱ Level 1-2 EV Charger | Amazon | $183 |
| Appliance Subtotal | $8,489 |
Total cost
| Grand Total without Rebates | $77,949 |
| Total Rebates, Grants and Incentives | -$31,747 |
| Grand Total for Electrification | $46,202 |
There are other incentives available that would have reduced this cost if we had a lower household income. Both the Illinois Solar for All program and Inflation Reduction Act provide large up-front discounts for solar and electrification projects if you make less than 80% of AMI, or the area median income ($83,000/year for a family of four in Cook County) or between 80-150% of AMI ($155,625/year).
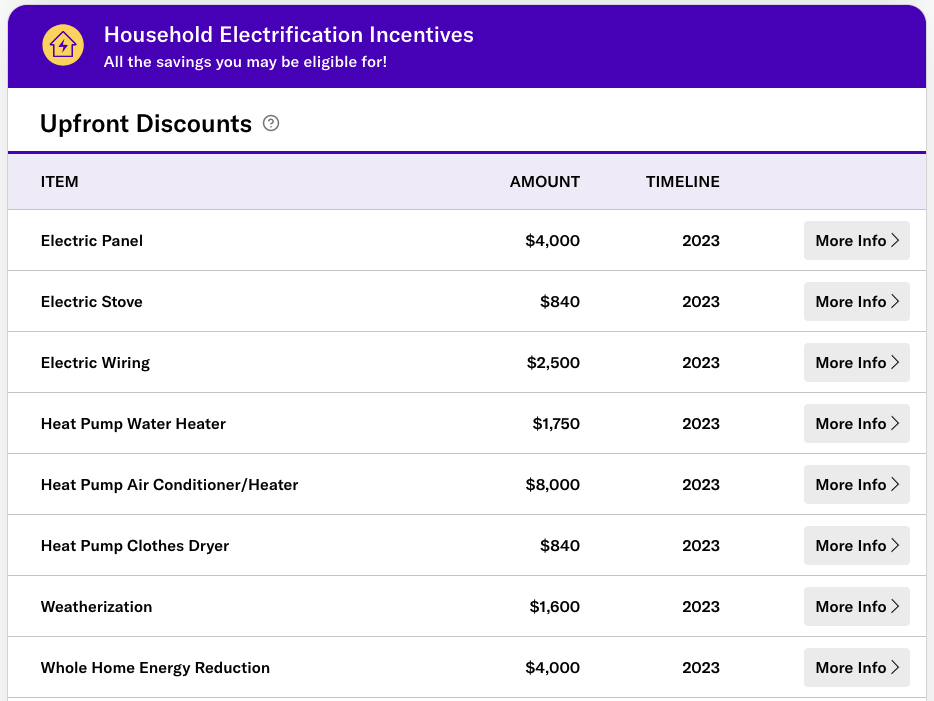
Rewiring America’s IRA Calculator
Running the numbers through Rewiring America’s IRA Calculator, I calculated the additional discounts from the Inflation Reduction Act for this same work for households with lower incomes:
| Item | Cost for household making >150% AMI |
Cost for household making 80-150% AMI |
Cost for household making 80 AMI |
| Grand Total without Rebates | $77,949 |
$77,949 |
$77,949 |
| Total Rebates, Grants and Incentives | -$31,747 |
-$43,973 |
-$46,243 |
| Grand Total for Electrification | $46,202 |
$33,976 |
$31,706 |
Furthermore, it is possible and even recommended to spread these costs out over several years. You don’t really have to do it all at once like we did, and even so it still took us 18 months from start to finish.
Why did we do this?
Our home is now fully electrified. We did it to eliminate the pollution our house was causing, and along the way we greatly improved the comfort and air quality of our home and reduced our long-term utility bills.
Your situation and goals may be different, so by all means don’t feel like you have to do everything we did. Your home may not have a good place for solar panels. You may not have a car and instead bike or take public transportation. In either case, or if your goal is to eliminate the pollution from your home for the lowest cost, focusing on installing heat pumps for heating and cooling, a heat pump water heater, induction stove and electric clothes dryer will do the trick. Properly planned, this could cost $20,000 - $30,000 for a single family home, depending on the size.
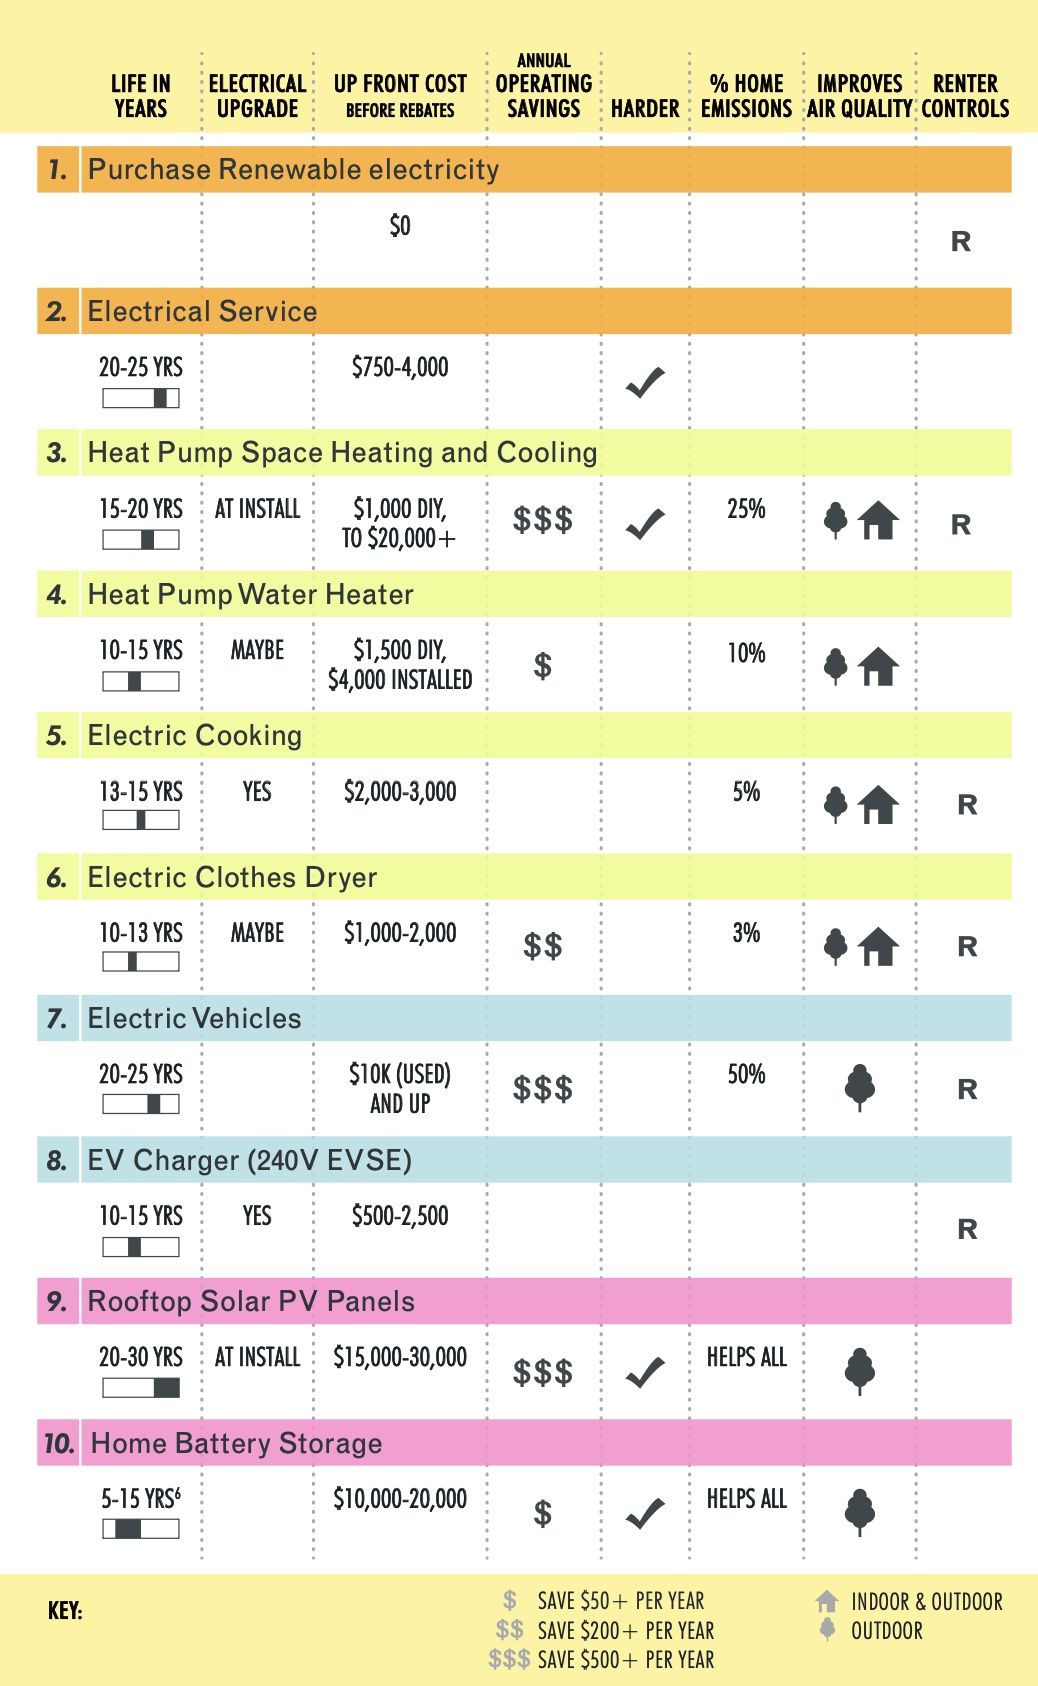
Rewiring America's Electrify Everything Checklist
For us, installing rooftop solar and getting an electric car along with electrifying everything else was what made sense for us.
We know that our energy bills are now a lot lower than they used to be. We no longer pay for gas, neither for our house nor our car, and are producing nearly 100% of our electricity thanks to our rooftop solar panels. We plan to track these costs and savings over the next year and share back what our annual utilities savings has been.
Until then, we will enjoy our fully electrified home and all the quality of life improvements that came with it: a more comfortable home, improved air quality, and fast, efficient cooking!
Play us out with the Electric Boogie, Marcia Griffiths!
Lessons learned
If you’re looking to electrify your appliances, I have a few lessons I learned that you’ll probably benefit from:
-
Upgrade your electric panel early: Upgrading our electrical service to 200 amps early in our process was very important. We got a discount on the cost by bundling it with our solar panel installation, and we needed the space for all of our additional electricity usage.
-
There are efficient dryers: We could have saved more energy by going with a ventless heat pump or condensing dryer, but decided for up-front savings instead with a cheaper standard electric dryer.
-
Level 1 EV charging might be enough for you: Before investing in a Level 2 charger at home, check how much you drive each day. If you drive less than 50 miles a day, a Level 1 charger may cover your charging needs overnight.
-
The best incentives right now are for solar panels: Rooftop solar has the most incentives and rebates by far. Even without our grant from the Village of Oak Park, the state and federal incentives covered more than half of the solar panel installation. All other incentives were pretty modest for us by comparison.
-
Heat Pumps and insulation were the most difficult to figure out, but also the most important: Out of all the upgrades we did to our home, we struggled the most with installing heat pumps, mostly because we heard from a lot of HVAC contractors that switching to heat pumps was not possible. Hopefully our struggles and these blog posts will help make it easier for others. But the struggle was worth it - we eliminated our largest source of climate pollution and greatly improved the comfort of our home.
Resources
- Part 1: Electrifying Our Old Oak Park Home: Going Solar
- Part 2: Electrifying Our Old Oak Park Home: Heat Pumps
- List of solar and heat pump installers in Oak Park
- Decarb My State: look up where U.S. emissions come from, state-by-state
- How much money will you save from the Inflation Reduction Act?
- Electrify Everything Home Guide
- The Electrify Everything Course by Nate the House Whisperer
- Edmund’s EV buying guide
Want to get my next post in your inbox? Sign up for email updates »
Email signup • derek@derekeder.com • © 2026 Derek Eder